Thursday, August 27, 2009

Configuring common targets using svn externals with Tortoise subversion

Hi all,

Today I would like to share an advanced topic in subversion using Tortoise SVN (a windows application, for more info click here).

Before I begin,I would like to tell a real-time use case for which I used svn:externals. I am working on a JAVA which has more than 100 modules and these modules are dependencies for the main project.I have some targets which are very common to all 100 modules (e.g: ant clean, ant reports, some ivy tasks), for this as a general practice I have included common and uncommon targets in every module of build.xml (It means if I want to do any common change for 100 builds, i have to modify 100 builds individually, which is lot of pain, time consuming factor) Then my team lead (John Stotler ) has given an excellent idea of implementing “Externals” into subversion.

After doing some little research and an article written by Jesper in his blog, I got an idea of setting up subversion externals using Tortoise subversion.

This article is written totally in considering the above scenario, svn:externals can be used in many ways for information on multiple scenarios please refer the official document.

Here is the procedure for configuring svn externals for common targets.

  1. Identify the common targets which are common for all dependencies/modules.Like in my scenario i have more 5 common targets which are required in every module.Common targets in the sense the content which is defined inside the target should be same in all other dependencies:

    Example: 

    <target name="clean" description="cleans build directory within your project">

    <delete dir="${builddir}"/> 

    </target>

  2. Create new xml file say (commontargets.xml) and add all the identified common targets in to that file and create folder “commontarget” with tags and trunk as subfolder, further add commontargets.xml to trunk folder.
  3. Do svn commit so that the folder stores in respective svn repository,Lets say the svn repository url for commontarget is http://subversion.company/repositories/projects/project1/externals/commons/commontargets/trunk/
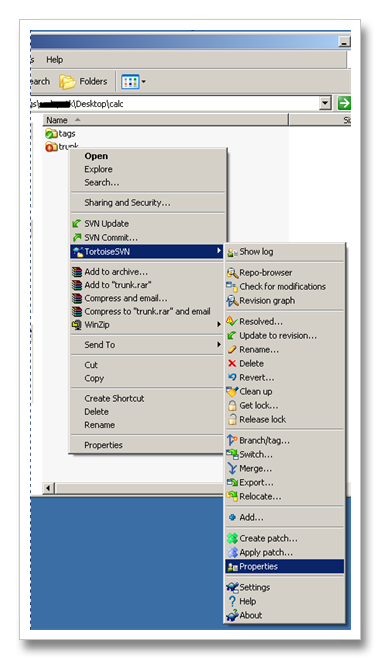
  4. Now open the project for which you want to add externals and right click on trunk and select “TortoiseSVN”>”Properties”
  5. A properties dialogue box opens and click on “New” and “add properties” dialogue box opens and from the top right drop down box select “svn:externals” and in the property value text box paste the commontargets svn repo url and click OK.
  6. Now open the project and do svn update, then your commontargets folder will in your project trunk folder.
  7. So do the same process of all projects which has a common targets and if you want to do any changes to common targets, just need to change commontargets.xml and commit the changes, that's it. every thing gonna be easy.

Let me know if you have any issues, I will try to answer.

--Kumar.

    Wednesday, August 26, 2009

    Tortoise Subversion a.k.a tsvn

    Hi guys,

    Its been a quite while, I didn't updated any posts in the blog since I was busy with new project with ESPN, I couldn't get enough time to write a new articles.

    Today I would like to share new topic which is very important if you are working on windows operating system.The topic is alternative way to checkout subversion repository using a tool called “Tortoise Subversion” also called as TortoiseSVN or TSVN.

    TSVN is a windows application software functions all features as ordinary subversion does. TSVN is mostly operated by mouse few clicks, no need to go through start>>run>>cmd.

    This is a best and alternative tool used for our regular svn tasks like svn co, scn update, svn commit, svn tag/branch, adding svn externals , svn delete and many more functionalities which we often forget the commands to perform the action.

    Lets take a look how can we Install and use TortoiseSVN:

    Requirements:

    1. Win2k SP4, WinXP, Vista or later
    2. Firefox (Optional)

    Get Software:

    1. This is a free open source software, no need to take loan or pay your year salary to purchase this product :-).
    2. Get the software from this link , download the respective software based on your operating system (32 bit or 64 bit).
    3. Download ,Install and restart the computer.
    4. After restart when you right click the mouse you should see the following screen:


    Now its time to test subversion task like checkout, commit and updates.

    svn checkout: This is used to download the repository to your work area (your pc), for this you need to create a new folder with your desired project name. To demonstrate we do checkout the code from http://svn.collab.net/repos/svn/trunk/

    Create a folder called calc(just for demo, you can create as u wish) and open the calc folder and right click mouse and click on “SVN Checkout”,

    a new window opens and enter this url in first box “url of repository” http://svn.collab.net/repos/svn/trunk/ and click ok,

    after a while complete code is downloaded from remote url to your local area, when you are done with checkout you will see the green tick on the folder which you created(in our case its calc).

    This is a brief description for the process of svn co and you can do similar process for rest of the svn tasks like update, commit etc.

    Tip: If you are a Firefox browser lover you can get svn plug-in which helps you to do svn tasks even when you are in web browser, for more information click this link or search tortoise svn Firefox plug-in, screenshot looks like this:

    Please feel free to post your comments and queries I will try to answer.

    --Kumar

    Wednesday, June 10, 2009

    Install Apache and IIS on Windows

    Hi

    Today we will discuss on a new topic called “Installing Apaches servers on same windows operating system where IIS is running.”

    Well, If you are reading this article , it means I guess you would have tried to install Apache and you get the following error while installing:

    Just ignore this error and go ahead and install apache. Once you have installed you need to change the port number of the Apache server.

    To do this:

    • Now that apache is installed, go to the folder that it was installed to. On my machine it was c:\program files\apache software foundation\apache2.2
    • Go to the /conf folder and open the httpd.conf file (may be named differently in the future or older versions)
    • Find the line “Listen 80″ and change to “Listen 8080″. Save the file.
    • Open a browser and try “127.0.0.1:8080″ or “ http://localhost:8080 " and you should get a page that says “It works” (that page is the apache default page).

    Please let me know if you have any issues in installing or getting some other error, I will try to troubleshoot.

    Please forgive me if the procedure doesn't work for you, I am just trying to help you out. If you have alternatives please post and scrap your feedback and valuable comments to encourage me :-).

    Kumar.

    Wednesday, June 3, 2009

    Creating a Simple MSBuild Project

    Hi,

    Today I would like to share on creating a simple MSBuild Project for Windows Forms Applications.

    Though MSBuild can support for multiple Applications types like Windows Forms Applications, Web Services, Web Applications, Smart Device Applications, Windows services, Console Applications, Hosted Applications. we will work on creating a simple MSBuild project for Windows Form Applications (also called as Smart Clients).

    To create a simple MSBuild project follow these steps:

    1. 1. Start Visual Studio, and create a new C# Windows application named MSBuild1.
    2. Accept the defaults, and click OK.
    3. In the Form Designer, drag and drop a new label onto the form.
    4. Set the text of the label to MSBuild demo.

    The form should look like :

    1. Click Save and exit.
    2. By Default your project saves under Project folder of Visual Studio 2008 (By default this folder resides at My Documents, e.g: C:\Documents and Settings\<Username>\My Documents\Visual Studio 2008\Projects\Msbuild1)
    3. Now to run this project go to command prompt and change directory to Msbuild1 project folder (E.g :C:\Documents and Settings\<Username>\My Documents\Visual Studio 2008\Projects\Msbuild1\Msbuild1) and type >msbuild.  or type msbuild msbbuild1.csproj and hit enter.
    4. For the first time running the project you will see the following screen.

    The above screen provides the following information:

    1. Looking for source target directory.
    2. Compiling the source code.
    3. Building msbuild1.exe in Debug directory.

    So the summary is whatever the customization that you would like to do this can be done for msbuild1.csproj file. msbuild1.csproj file contains all information of the project which you want clean. compile,build an exe file and lot more.

    Please post your feedback and queries so that I can improve my presentation skills.

    Kumar.

    Monday, June 1, 2009

    Maven Bamboo Interview Questions

    Hi,

    Today I would like to share some Questions which were asked me during an interview on Maven and Bamboo.

    Maven Questions:

    1. Why maven is a great build tool? how does it differ from other Build tools?
    2. Tell me more about Profiles and Nodes in Maven?
    3. Tell me more about local repositories ?
    4. How did you configured local repositories in different environment (Development, Testing , Production etc)?
    5. What is Transcend Dependencies in maven 2?
    6. Did you wrote plugins in maven? if so what are they?
    7. Why a matrix report is required during a new release?  How does this benefit QA Team?
    8. What are pre-scripts and post-scripts in maven? Illustrate with an example?
    9. What are the checklists for artifacts ? and what are the checklists for source code artifact?
    10. Tell me the experience about Static Analysis Code?

    Bamboo Questions:

    1. Tell me more about continuous integration ? How did you configured?
    2. Plugins used in Bamboo?
    3. Tell me more about Bamboo Schedule Options?
    4. How did you configured Bamboo with Subversion?

    Configuring Subversion On Windows

    Hi

    Today I would like to share configuring one of the most popular open source version control software called "Subversion".

    Subversion is an open source version control software available for windows version.

    Subversion can be configured in two way

    1. Using Command Prompt. (Should be available in zip file)
    2. One Click Installer.(Should be available in msi file)

    Pre-Requisites:

    Before you install Subversion there are some pre-requisites :

    1) Make sure Apache is already installed , if not, download from here : click here

    2) To know wether apache is installed correctly or not make sure by typing http://localhost/ in Internet browser, then the output should be looks similar to the following screen.

    Installing Subversion:

    • Get the latest version of Subversion : Click Here
    • Double Click the Setup-Subversion-version number.msi

    So far we have successfully subversion in windows.

    Integrating Subversion with Apache:

    Now we  have to  integrate subversion with Apache, to do this follow the steps:

    • Open Apache Root Directory ( e.g: C:\Program Files\Apache Software Foundation\Apache2.2\modules)
    • Open Subversion Root Directory (e.g: C:\Program Files\Subversion\bin)
    • Start >> All Programs >> Subversion >> Click On "Readme"
    • Follow the instructions that are mentioned in the Readme.txt file. or follow step 5
    • Instructions are:
    • Create a repository folder name "svn" in C drive.(e.g: C:\svn)
    • Copy mod_dav_svn.so, mod_authz_svn.so from C:\Program Files\Subversion\bin to C:\Program Files\Apache Software Foundation\Apache2.2\modules.
    • Add "C:\Program Files\Subversion\bin;" to the SYSTEM PATH


    • Now Restart Apache Services (From Start>> All Programs >> Apache HTTP Server >> Control Apache Server >>Restart.
    • Now go to Start>> All Programs >> Apache HTTP Server >> Configure Apache Server >> click on Edit the Apache httpd.config configuration file.
      1. Uncomment the following two lines:
        #LoadModule dav_fs_module modules/mod_dav_fs.so
        #LoadModule dav_module modules/mod_dav.so
      2. Add the following two lines to the end of the LoadModule section:
        LoadModule dav_svn_module modules/mod_dav_svn.so
        LoadModule authz_svn_module modules/mod_authz_svn.so
      3. Add the following to end of the file.
        <Location /svn>
        DAV svn
        SVNPath C:\svn
        </Location>
    • To make sure you have installed Subversion correctly go to command prompt and type : svn  --version  .The following output should be appear.

    In the Next tutorial we will continue adding project to Subversion and which further can access through localhost.

    Please post comments and feedback .

    Kumar.

    Friday, May 22, 2009

    Configuring Java On Windows

    Hi
    Today I would like to share about how to configure JAVA on Windows machine.
    Many of the SCM tools are depending on Java, So in order to run SCM tools on your machine JAVA is required, To check whether your PC has java or not, just open command prompt from start >> run and type CMD and enter.
    In command prompt type "javac" and hit enter. if it say "javac" is not a recognized command, then you computer is not configured JAVA.
    Here are simple steps to configure JAVA.

    1. Download latest version of JDK from Java website : Click Here or alternatively you can download from here: Click Here (Rapidshare)
    2. Install JDK.
    3. Right click on My Computer and click on Properties.
    4. Advance >> Click Environment Variables.
    5. Under System Variables click "New"
    6. Name: JAVA_HOME
    7. Path: C:\Program Files\Java\jdk1.6.0_13 and click OK.
    8. Java_Home
    9. Under System Variables find variable name "Path" and click "Edit" and add the following path with ";D:\Program Files\Java\jdk1.6.0_13\bin" (Remove quotes)
    10. java path
    11. Click OK and Click Apply and OK on Properties Window.
    12. Now go to command prompt and type "javac" and hit enter.
    13. If you get the following message then JAVA is configured in you machine.

    Java Configuration

    If you have any queries or feedback, please feel free to post as comments.

    Kumar.

    MSBuild Quick Start

    Hi,

    Today i configured MSBuild in my laptop, though Microsoft has given a detailed installation for configuring MSBuild , how ever i would like to put it in simple steps starting from configuring MSBuild and creating a sample build .

    Pre-requisites:
    1. Assume you have already installed .NET framework in your machine. If not you can download from the following link. Click Here
    2. Assume you have already installed .NET framework SDK in your machine.If not you can download from the following link. Click Here
    Configuring MSBuild :
    1. Start >> right click on My Computer and Properties.
    2. Go to Advance Tabs >> Click on Environment Variables.
    3. In System Variables look for "Path" and click Edit.
    4. Make sure you the following paths are set, if not please update and click ok.
    • C:\WINDOWS\Microsoft.NET\Framework\version number;
    • C:\Program Files\Microsoft.NET\SDK\version number\bin
    Now go to Start >> Run and type "cmd" to open a command prompt.
    type: msbuild and hit enter. then you will see the MSBuild with a version number and an MSBuild error.


    Don't worry about Error, it means MSBuild is running successfully on your PC.

    Next Step is creating a sample build for any .Net project.

    For demonstration let's create a build for "Helloworld" .Net Project, If you don't have the project you can download from here: Click Here

    Download and Extract to C Drive, so your extracted folder looks like this : c:\helloworld
    1. Hello.cs (C# file)
    2. HelloWorld.proj (Build file)

    Now you have to run HelloWorld.proj file to create a build using MSBuild.
    To know more about .Proj file you can visit Microsoft site: Click Here.

    Your HelloWorld.proj is the jist of the project that you are going to create a build.

    Now go to command prompt and change the directory :
    1. cd c:\HelloWorld
    2. c:\HelloWorld>msbuild HelloWorld.proj
    Out put should be as follows:

    You see an HelloWorld.exe file created in C:\HelloWorld folder.

    So, that's all you have created build for hello.cs file.

    To test HelloWorld.exe you can just type HelloWorld.exe from HelloWorld directory.

    Then the output would be "Hello World !"

    Please share your thoughts and feedback to improve this article.

    Kumar.

    Thursday, May 21, 2009

    What is Software Configuration Management (SCM) ?


    Software Configuration Management (SCM) in short, is tracking and controlling the software and IT projects in different environments.

    SCM Includes:
    1. Version Controll Management
    2. Change Management
    3. Release Management
    4. Build Management